Inside – Learn how to crochet a beginner friendly witch hat coaster for Halloween. Keep reading for the free crochet pattern.
The Bewitched Hat Coaster is a beginner friendly crochet pattern. It uses basic stitches with gentle increases to build your crochet skills. At the end, you will have an adorable coaster to hold your favorite witch’s brew.
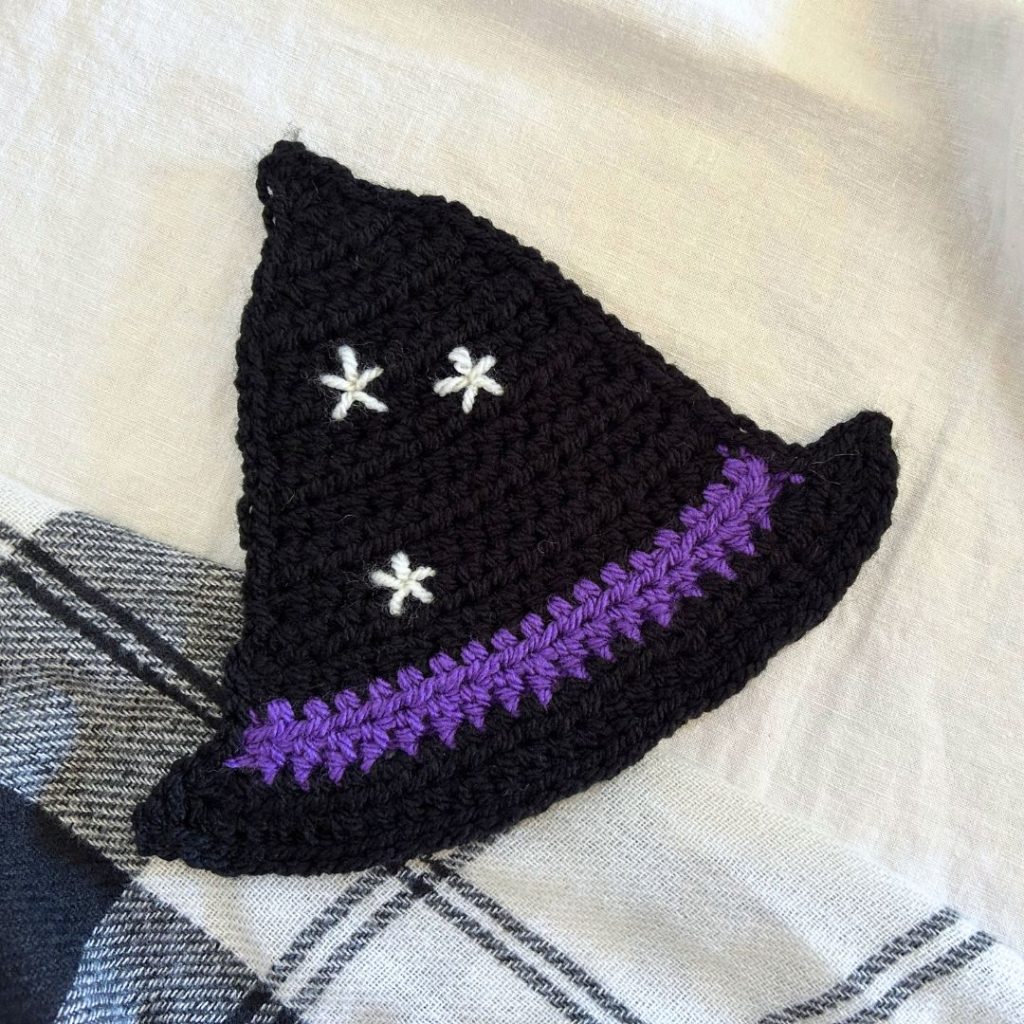
Inspiration for the Bewitched Hat Coaster
What is the easiest way to spruce up your space for any holiday? Coasters.
Pulling out a collection of coasters is a simple habit to add freshness to your home. This Halloween my home needed a few magical details to adorn the surfaces rather than continue cluttering up the walls. And let’s be honest, a side table can only hold so many crocheted pumpkins before it begins to look like a pumpkin patch.
So, if you are a bit tired of crocheting pumpkins, then let’s make a witch hat coaster together!
What you’ll love about the Bewitched Hat Coaster
- VERY beginner friendly pattern
- Uses minimal about of yarn / ideal for using your stash
- Quick to make project

Customize this Coaster
There are a handful of ways you can customize this coaster. Below I discuss yarn options, color options, and even project options!
Yarn + Substitutes
This pattern uses a worsted weight (category 4), 100% acrylic yarn. My favorite is the Paintbox Yarns Aran, but you can use any from your stash. You need about 30yds of the main color (black), and 1yd each of the two other colors.
Why acrylic? Because it’s what I had in my stash, and I’m not using this coaster as a hot pad.
Substitutes – Cotton yarn would be a great alternative! Especially if you’d like this coaster to catch condensation, or use it as a hot pad.
Project Alternations
As I designed this coaster, I couldn’t stop imagining it as a garland. Time constrained me to only crocheting the Bewitched Hat Coaster, but when I have the time, I’d love to make this into a garland!
Color Choices – These are endless! I love a good black and purple for Halloween decor, but you could swap the black for dark blue to recreate Mickey Mouse’s Wizard’s Hat.
Need to save this pattern for later?
Add it to your Crochet Pinterest Board!
NOTE ABOUT THIS FREE CROCHET PATTERN :
Thank you for choosing this free pattern as part of your crochet journey! It’s an honor for you to be here, browsing the High Desert Yarn Blog. This pattern is 100% free for you to crochet from, but please, do not screenshot, or copy+paste this pattern. However, work directly from this webpage. The ad revenue from this website allows me to offer free crochet patterns. If you do not like the scrolling, or ads, then you may purchase the ad-free PDF in my Etsy Shop or Ravelry Store. Thank you for your cooperation. Happy creating! -Joanna (Owner + Creative)
Materials
- Yarn – Worsted (category 4) weight yarn
- I used Paintbox Yarns Simply Aran, 201yds/100g, 100% Acrylic
- You will need 3 colors to create this coaster.
- Black (MC) = 30yds
- Purple (CC) = 1yd
- White (CC2) = 1yd
- Crochet Hook – H/8 (5.00mm), or hook to meet gauge
- Notions – Tapestry Needle, Scissors
Notes
- Experience Level – Beginner
- You will need to know how to create a Half Double Crochet, and increase stitches before beginning.
- This pattern is crocheted in turning rows.
- CH 1 DOES NOT count as a stitch.
Finished Size
Size is measured before blocking, and at the widest part of the coaster.
- Width – 8.5″
- Height – 7″
Gauge
- 13 sts x 10 Rows = 4×4”
- Gauge is measured before blocking.
- Gauge pattern is worked in half double crochet.
Stitch Abbreviations
US crochet terms used throughout.
- CH(s) – chain(s)
- HDC – half double crochet
- SL ST – slip stitch
- st(s) – stitch(es)
- MC – main color (black)
- CC – contrasting color (purple)
- CC2 – contrasting color 2 (white)
- Rep – repeat
Written Instructions
In MC, chain 2.
Row 1: In 2nd ch from hook, HDC, ch 1, turn. (1 st)
Row 2: 3 HDC in the st, ch 1, turn. (3 sts)
Row 3: In the 1st st, 2 HDC, HDC in the next st, 2 HDC in the last st, ch 1, turn. (5 sts)
Row 4: In the 1st st, 2 HDC, HDC in the next 3 sts, 2 HDC in the last st, ch 1, turn. (7 sts)
Row 5: In the 1st st, 2 HDC, HDC in the next 5 sts, 2 HDC in the last st, ch 1, turn. (9 sts)
Row 6: HDC in each st across, ch 1, turn. (9 sts)
Row 7: In the 1st st, 2 HDC, HDC in the next 7 sts, 2 HDC in the last st, ch 1, turn. (11 sts)
Row 8: HDC in each st across, ch 1, turn. (11 sts)
Row 9: In the 1st st, 2 HDC, HDC in the next 9 sts, 2 HDC in the last st, ch 1, turn. (13 sts)
Row 10: HDC in each st across, ch 1, turn. (13 sts)
Row 11: In the 1st st, 2 HDC, HDC in the next 11 sts, 2 HDC in the last st, ch 1, turn. (15 sts)
Row 12: HDC in each st across, ch 1, turn. (15 sts)
Row 13: In the 1st st, 2 HDC, HDC in the next 13 sts, 2 HDC in the last st, ch 1, turn. (17 sts)
Row 14: HDC in each st across, change colors to CC (purple) and do not cut the MC (black) yarn, ch 1, turn. (17 sts) You will carry the MC (black) yarn up the side of the hat until the next color change at the end of Row 16.
Rows 15-16: Rep Row 14, change colors to MC (black) and cut the CC (purple) yarn, ch 1, turn.
Row 17: In the 1st st, 3 HDC, *HDC in the next 3 sts, 2 HDC in the next st, rep from * until 4 sts remain, HDC in next 3 sts, 3 HDC in the last st, ch 1, turn. (24 sts)
Row 18: In the 1st st, 3 HDC, *HDC in the next 3 sts, 2 HDC in the next st, rep from * until 3 sts remain, HDC in next 2 sts, 3 HDC in the last st, ch 2, do not turn or cut yarn. (33 sts)
Border
Starting at the brim’s right corner, sl st around the edge of the border. When you get to the top of the hat, ch 2 between sl sts to create a “point”. When you get to the brim’s left corner, ch 2 between sl sts to create a “point”. Continue to sl sp along the bottom of the brim to the right corner. Fasten off and weave in any remaining ends.

Embroidered Star (optional)
Cut an 8” piece of CC2 (white) yarn, and thread through a tapestry needle. Repeat these instructions as many times as you’d like.
* Insert your needle from back to front, starting in the center of your star. (First Leg Only – Leave a small yarn end in the back of the work to fasten.) Measure about 1 HDC/Row Width from the star’s center, and insert the needle from front to back. Gently pull the yarn through to create the first “leg” of the star. Rep from * 4 more times, and space the “legs” around the center as evenly as possible. After the 5th leg, use the yarns to secure a knot on the back of the coaster. Cut ends.
Bewitching Halloween Blog Hop
Thank you for visiting my blog today! The Bewitched Hat Coaster pattern is available as a free download today (October 21, 2025) at 10AM Central Time. This is a direct download from the HDY Blog. You can find the download link by clicking on the button below.